
This post will show you how to get down with Android-app development using Flash/Actionscript. All tools used are free, so no licenses are needed.
What's neat with using Flash to develop your apps is that it's pretty much platform independent. The same project can be built for web, desktop, Android and iOS. When your app is built for desktop or mobile devices it utilizes something called Adobe AIR (Adobe Integrated Runtime) which is - to simplify it - an alternative way to present Flash content rather than the common Flash player (which usually resides as a plugin of web browsers). On mobile devices AIR is embedded in your application so - to the user - it will work as any other app.
Rather than using the traditional Flash technology using MovieClips, Sprites etc in a graphical timeline of layers we'll be using the Starling framework which is a very competent game engine (although not limited to game development). This framework uses Flash´s Stage3D technology which - by using the computers GPU (Graphics Processing Unit) - delivers high performance, something that is most important to mobile development since those devices not measure the same computing performance as compared to computers. Starling is also officially embraced by Adobe and is included in the Adobe Gaming SDK.
Prerequisites
You can the source for this project here.
Follow this guide on how to install FlashDevelop with Flex and make sure that you also follow these steps in order to patch the Flex SDK with the latest AIR SDK (when written 4.6.0/3.5). If you don't patch the SDK you most likely will end up with errors.
Download the Android SDK and install. If you don't plan to actually test your project on an Android device you can skip this step.
Download Starling and extract.
Let´s start developing!
Start FlashDevelop and create a "AIR Mobile As3 App" project.
Copy \starling\bin\starling.swc to the project lib-folder.
(The SWC is the latest stable version and might therefor not be the same as the source included in the archive. But unless you really require a new fix or feature, the stable version is the one to use.)
In order to use access the content of starling.swc, you need to add it to the class library. This is done by right clicking on the swc in question and select "Add to library".

Goto the project properties and ensure that the used SDK matches the one under output (when this was written the latest version was Flex 4.6.0 and AIR 3.5, if you need help with installing you'll find information here).

Under the bat-folder of your new project there is a file called SetupSDK.bat, which most likely need some editing. Open it up and ensure that FLEX_SDK and ANDROID_SDK points toward the two paths where you have the SDKs installed.

Another file that is good to know is the Run.bat file in the root of your project. This file is responsible for what will happen when you decide to run the project. As default it will run in desktop-mode and with the screen size of a Nexus One (which is 480x762). The last line in the bat file contains a pause-command that will require a key press to close down the command console. Althoug this is good for detecting build errors, it's also a bit unneeded when the build runs fine. You might want to change the pause into a timeout that instead will wait for the specified amount of seconds (or key press) before closing the console.

The third file to learn before we get down to the actually coding is application.xml in the project´s root. This is where the information about your application is specified. You should start by entering a unique id and name. Preferably this should not be changed later during development. On the other hand, the version number in this file should, in order to keep builds apart.

Add a new folder to your project called "assets" and place an image into this folder, preferably in the same league size-wise as our project.
Open src\Main.as and edit accordingly:
package {
    import flash.desktop.NativeApplication;
    import flash.display.Sprite;
    import flash.display.StageAlign;
    import flash.display.StageScaleMode;
    import flash.events.Event;
    import starling.core.Starling;

    public class Main extends Sprite {
        private var _starling:Starling;

        public function Main():void {
            // This time we won't scale our application (check next post for that :).
            stage.scaleMode = StageScaleMode.NO_SCALE;
            stage.align = StageAlign.TOP_LEFT;

            // Trigger an event handler when application looses focus (see note in handler).
            stage.addEventListener(Event.DEACTIVATE, deactivate);

            SetupStarling();
        }

        private function SetupStarling():void {
            // Create a new instance and pass our class and the stage
            _starling = new Starling(MyStarlingApp, stage);

            // Show debug stats
            _starling.showStats = true;

            // Define level of antialiasing,
            _starling.antiAliasing = 1;

            _starling.start();
        }

        private function deactivate(e:Event):void {
            // Auto-close the application when it looses focus. This is what you want
            // to do if you don't want that your application continues to run in the
            // background if the user switch program, answer a call or anything else
            // that would cause your application to lose focus.
            //
            // If you want to keep it running you should at least pause it until the
            // user returns. That's achieved by calling _starling.stop(). You should
            // also add an event listener for the Event.ACTIVATE event that will
            // trigger _starling.start() once the application get's focus again.
            //
            NativeApplication.nativeApplication.exit();
        }
    }
}
How to speed up your coding
FlashDevelop has some neat features to speed up development, one of which is the code generator represented by Ctrl+Shift+1. It allows you to generate reoccurring code such as variables, methods and classes. To use this powerful feature, place the text cursor at the currently not existing class MyStarlingApp, press Ctrl+Shift+1 and select "Create new class".
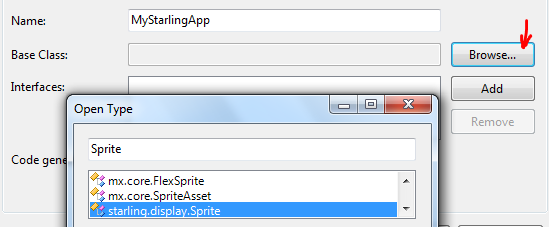
Click "Browse" to specify the base class and locate "starling.display.Sprite". Notice that there might be a couple of other classes called Sprite, but it's the Starling one you want.
Select "Generate constructor matching base class" and hit "Ok" (for sprites it doesn't really matter, but it's good to make this a practice when creating subclasses).

You are now in your new class!
Add an event listener (because we want to wait until we're actually on stage before starting to do the magic).
If classes you want to access in your code aren't already imported you can do this by - yet again - place the cursor at the class name (in this case it will be Event) and then press Ctrl+Shift+1. If only one class exists by the name written it will be autoselected. In case of Event there will be more. Yet again you want the one
from Starling.
src\MyStarlingApp.as:
package {
    import flash.display.Bitmap;
    import starling.display.Image;
    import starling.display.Quad;
    import starling.display.Sprite;
    import starling.events.Event;
    import starling.textures.Texture;

    public class MyStarlingApp extends Sprite {

        [Embed(source="/../assets/Happy.png")]
        private static const MyImage:Class

        private var _image:Image;

        public function MyStarlingApp() {
            super();

            addEventListener(Event.ADDED_TO_STAGE, onAddedToStage);
            addEventListener(Event.ENTER_FRAME, onEnterFrame);
        }

        private function onAddedToStage(e:Event):void {
            removeEventListener(Event.ADDED_TO_STAGE, onAddedToStage);

            createAndShowImage();
        }

        private function createAndShowImage():void {
            // Create bitmap instance and use it to create an image
            var myBitmap:Bitmap = new MyImage();
            _image = Image.fromBitmap(myBitmap);

            // Change images origin to it's center
            // (Otherwise by default it's top left)
            _image.pivotX = _image.width / 2;
            _image.pivotY = _image.height / 2;

            // Where to place the image on screen
            _image.x = stage.stageWidth / 2;
            _image.y = stage.stageHeight / 2;

            // Add image to display in order to show it
            addChild(_image);
        }

        private function onEnterFrame(e:Event):void {
            // Rotate slightly each frame
            _image.rotation -= 0.01;
        }
    }
}
If you want to use degrees you convert them to radians like this:
radians = degrees * Math.PI / 180
Code clean-up
Another feature in FlashDevelop that may become useful is the code cleanup. You can perform it either by selecting the area that you wish to format or with nothing selected in order to perform the cleanup on the whole file, and proceed to press Ctrl+Shift+2. If you find that the formatting isn't pleasing you can change a lot of options in the program´s settings to match your preferred style.Let's run the app
Hit F5 to start your application, you should be seeing your image rotating on the screen.Pretty neat for such few lines of code? Well now comes the really cool stuff. Let´s build this for Android!
Build for Android
First of all, you need a certificate for your app. In the case of Android you can create this by yourself (in opposite to iOS where you need to obtain it from Apple). First, edit bat\SetupApplication.bat and change the password for the Android certificate (AND_CERT_PASS).
Now it's time to run bat\CreateCertificate.bat, when it's done the new certificate will be present in the cert-folder.
In the root of your project there's a file called PackageApp.bat, run it. You will be prompted to select your build target. I will make a future post about iOS (or you can go through the generated readme-file called AIR_iOS_readme.txt) so lets pick Android for now. You're opted with three alternatives:
Normal, debug or captive.
If you want your app to embed the AIR runtime (so that it doesn't require an additional download and installation of AIR besides your app) you should choose captive. This will also ensure you that your app will be running using that exact build of AIR.
When finished the dist-folder will contain a new .apk-package for you to install and test on your Android device.
You'll most likely need to enable your device to allow installation of apps from "unknown sources" (i.e. non-market apps). You'll find a tutorial about how to install non-market apps here.
Epilogue
There are plenty of steps yet to take before being a full fledged app-developer - such as handling the many screen resolutions on different devices etc - but I hope this was a quick start to show that app-development is possible using only free tools. And that the reports of Flash´s death are greatly exaggerated.Where to go from here? You should definitely get the free book "Introducing Starling" from O´Reilly. This is also a great place to start when learning more about Starling.
If you're new to Flash and Actionscript you might want to find a good book or two and tutorials about Actionscript 3.
Good luck with your coding!
Download source codeThe complete FlashDevelop project. You'll need to change the paths in bat\SetupSDK.bat to match your development environment.
Comments
comments powered by Disqus