
This is the second post aimed at app development using Flash. The previous post showed how to create a simple app with Flash.This post will explain how to develop for multiple resolutions, something that is necessary on the mobile market where the screen resolution may vary from 426x320 pixels up to full HD. Not only does the screen resolution vary, the screen ratio does also vary ranging from 16:9 to 4:3.
The theory
So, how does one cater for all these resolutions? Simply put, you develop based on the lowest resolution and then scale upwards. This way you only have one code base and instead trust the graphics engine to get it right.
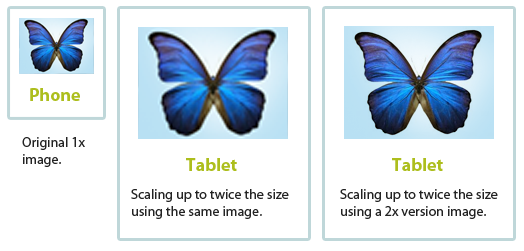
But wouldn't scaling low-res graphics onto a full HD screen look extremely fuzzy? Yes, it would. And that's why you need to provide multiple sets of graphics. Although we are going to develop for the smallest resolution up scaling graphics hundreds of percentage is not a good idea. Instead we will provide graphics in multiples of the smallest resolution and use the ones that best matches the display. For instance, if we need to display an image twice the size compared to the smallest resolution that we develop for we will use graphics that is twice the size.
The difference is displayed below:
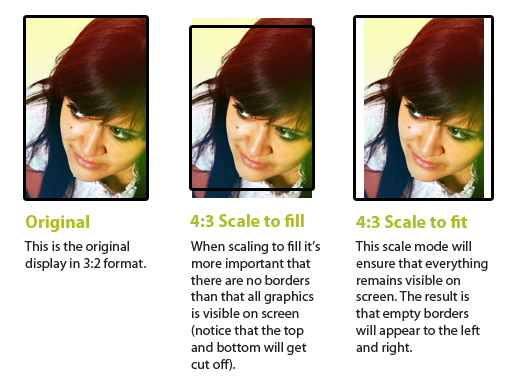
One of the decisions that we need to make is how we want to handle different ratios. Let say that we choose to develop for a 3:2 format (let say basing our project on the original iPhone size 320x480). How do we wish it to scale onto a 4:3 or 16:9 display? We have two choices; either we'll scale to fit all or we'll scale so that there's no borders:
Decision time
We decide to develop for 320x480, a 3:2 aspect ratio. We will provide graphics in 1x, 2x and 3x. That means that we will have pixel perfect graphics for 320x480, 640x960, 960x1440. Any resolution in between will display scaled graphics.
All code we write will assume that we're on a 320x480 screen, and the graphics engine will handle all scaling for us. If we for instance place an image sized 32x32 at position 10, 20 - it will appear on a 640x960 screen as a 64x64 image at 20, 40, as the scale factor between 320x480 and 640x960 is 2.
As we're more interested in that all our content is displayed properly than that the complete screen is used all the time we will select the scale-to-fit mode. This ensures that everything is visible even if it means adding borders to the left and right or above and beneath.
Let's write some code!
It's time to test this out. We'll do the development in FlashDevelop using Starling as the framework of choice. We'll be using our last project - which you find here to download (or this complete project already done here to save some time).
Let´s start by writing the main class. Compared to the last project we'll add a little bit more code in the Starling setup. We'll set a viewport - which is the largest work area that matches our requested ratio against the screen size - and stage size to a predefined value, in this case 320x480.
Main.as:
package {
    import flash.desktop.NativeApplication;
    import flash.display.Sprite;
    import flash.display.StageAlign;
    import flash.display.StageScaleMode;
    import flash.events.Event;
    import flash.geom.Rectangle;
    import starling.core.Starling;
    import starling.utils.RectangleUtil;
    import starling.utils.ScaleMode;

    public class Main extends Sprite {
        private static const STAGE_WIDTH:int = 320;
        private static const STAGE_HEIGHT:int = 480;

        private var _starling:Starling;

        public function Main():void {
            // Tell Flash not to scale, that will be done by Starling instead
            stage.scaleMode = StageScaleMode.NO_SCALE;
            stage.align = StageAlign.TOP_LEFT;

            // Trigger an event handler when application looses focus (see note in handler).
            stage.addEventListener(Event.DEACTIVATE, deactivate);

            setupStarling();
        }

        private function setupStarling():void {
            // Get the preferred stage size based on our smallest target resolution
            var stageArea:Rectangle = new Rectangle(0, 0, STAGE_WIDTH, STAGE_HEIGHT);

            // Get the fullscreen size available
            var fullscreenArea:Rectangle = new Rectangle(0, 0, stage.fullScreenWidth, stage.fullScreenHeight);

            // Fit the stage to the full screen. ScaleMode.SHOW_ALL ensures that everything will be visible (not croping will occur).
            var viewport:Rectangle = RectangleUtil.fit(stageArea, fullscreenArea, ScaleMode.SHOW_ALL);

            // Create a new instance and pass our class, the stage and the wished viewport
            _starling = new Starling(MyStarlingApp, stage, viewport);

            // Show debug stats
            _starling.showStats = true;

            // Define level of antialiasing,
            _starling.antiAliasing = 1;

            // Set to our preferred stage size
            _starling.stage.stageWidth = STAGE_WIDTH;
            _starling.stage.stageHeight = STAGE_HEIGHT;

            _starling.start();
        }

        private function deactivate(e:Event):void {
            // Auto-close the application when it looses focus. This is what you want
            // to do if you don't want that your application continues to run in the
            // background if the user switch program, answer a call or anything else
            // that would cause your application to lose focus.
            //
            // If you want to keep it running you should at least pause it until the
            // user returns. That's achieved by calling _starling.stop(). You should
            // also add an event listener for the Event.ACTIVATE event that will
            // trigger _starling.start() once the application get's focus again.
            //
            NativeApplication.nativeApplication.exit();
        }
    }
}
As we selected to work from the 320x480 resolution and scale it to fit - the top left corner is always at 0, 0 and the bottom right at 320, 480.
We go over to MyStarlingApp.as and add three images to use for 1x (320x480), 2x (640x960) and 3x (960x1440). We will read the value in Starling.contentScaleFactor to get the scale factor and chose the appropriate image. Up to scale factor 1.5 we'll use 1x, 1.5 to 2.5 we'll use 2x and for anything above 3x.
We'll also add a TextField to display some text.
MyStarlingApp.as:
package {
    import flash.display.Bitmap;
    import starling.core.Starling;
    import starling.display.Image;
    import starling.display.Quad;
    import starling.display.Sprite;
    import starling.events.Event;
    import starling.text.TextField;
    import starling.textures.Texture;

    public class MyStarlingApp extends Sprite {

        [Embed(source="/../assets/1x/Happy.png")]
        private static const MyImage1x:Class

        [Embed(source="/../assets/2x/Happy.png")]
        private static const MyImage2x:Class

        [Embed(source="/../assets/3x/Happy.png")]
        private static const MyImage3x:Class

        private var _image:Image;

        public function MyStarlingApp() {
            super();

            addEventListener(Event.ADDED_TO_STAGE, onAddedToStage);
        }

        private function onAddedToStage(e:Event):void {
            removeEventListener(Event.ADDED_TO_STAGE, onAddedToStage);
            addEventListener(Event.ENTER_FRAME, onEnterFrame);

            createAndShowImage();
            addTextField();
        }

        private function addTextField():void {
            // Add a textfield containing some text
            var textContent:String = "Our scale factor is " + Math.round(Starling.contentScaleFactor);
            var textfield:TextField = new TextField(300, 120, textContent, "Arial", 32);
            textfield.autoScale = true;
            textfield.x = 10;
            textfield.y = 360;
            textfield.hAlign = "center";
            textfield.vAlign = "center";
            addChild(textfield);
        }

        private function createAndShowImage():void {
            // Create bitmap instance and use it to create an image
            _image = getCorrectImageForThisDisplay();

            // Change images origin to it's center
            // (Otherwise by default it's top left)
            _image.pivotX = _image.width / 2;
            _image.pivotY = _image.height / 2;

            // Where to place the image on screen
            _image.x = stage.stageWidth / 2;
            _image.y = stage.stageHeight / 2;

            // Add image to display in order to show it
            addChild(_image);
        }

        private function getCorrectImageForThisDisplay():Image {
            // Get the scaling factor (1, 2, 3 etc)
            var scalingFactor:int = Math.round(Starling.contentScaleFactor);

            if (scalingFactor == 1) {
                return Image.fromBitmap(new MyImage1x(), false, 1);
            }
            else if (scalingFactor == 2) {
                return Image.fromBitmap(new MyImage2x(), false, 2);
            }
            else {
                return Image.fromBitmap(new MyImage3x(), false, 3);
            }
            // If you have a 4x version of the graphics, here is the place to add some code..
        }

        private function onEnterFrame(e:Event):void {
            // Rotate slightly each frame
            _image.rotation -= 0.01;

            // Side-note: The value for rotation is in radians not degrees.
            // If you want to use degrees you convert them to radians like this:
            //
            //   radians = degrees * Math.PI / 180
        }
    }
}
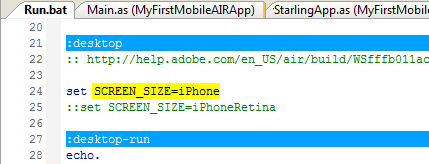
Set debugger size
We'll start out running this on a smaller screen that will use our 1x version of the image. Open Run.bat in the project root and set SCREEN_SIZE to iPhone. This will run the application in a 320x480 sized window.
Hit F5 to run the application. The text should say that we're using the 1x version of the image.
Exit the application and edit Run.bat again. This time change SCREEN_SIZE to iPhoneRetina. This will run the application in a 640x960 sized window.
Once again hit F5 to run the application. The text should now have changed to say 2x.
Test out your project with a couple other screen sizes, you find a comprehensive list of available SCREEN_SIZE variables here.
Epilogue
We've now updated our project to work on all kinds of resolutions. We can now develop without worrying over what screen resolution our application will run under and place images and other objects at static pixel positions and let Starling handle the scaling.
In this example we chose to scale to fit so that none of our content would be out of view regardless of which ratio the screen resolution have. The downside of this is that we might get borders on some screens. For games you might want to use the complete screen and scale to fill instead. Important to remember in that case is to define a safe zone on the screen that you know always will be visible regardless if the screen is 4:3, 16:9 or any other ratio.
Next tutorial will be aimed at gaming and introducing the use of a physics engine. Until then, happy coding!
Download source code for the complete FlashDevelop project You'll need to change the paths in bat\SetupSDK.bat to match your development environment.
Comments
comments powered by Disqus